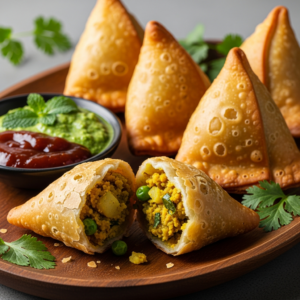
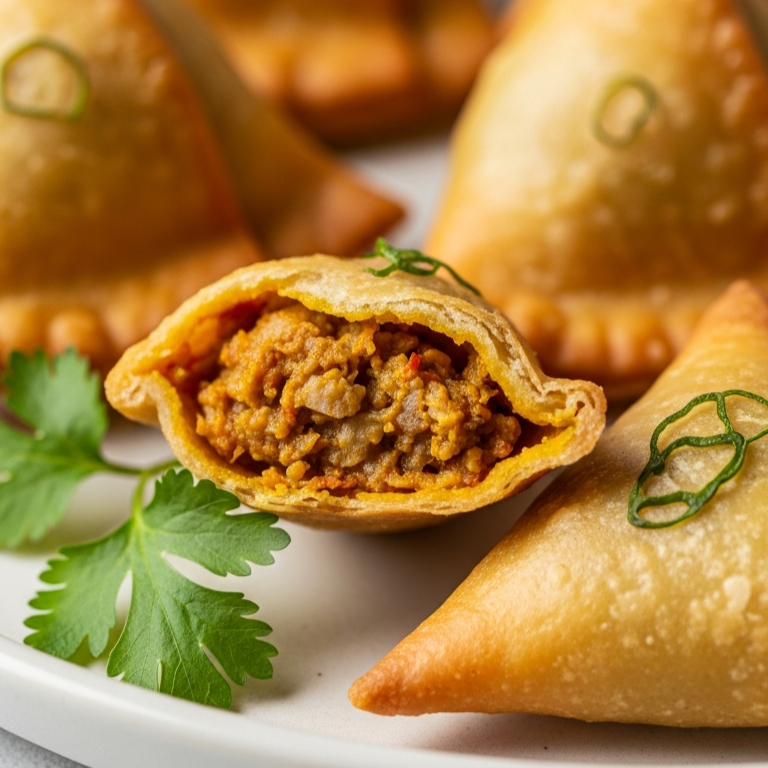
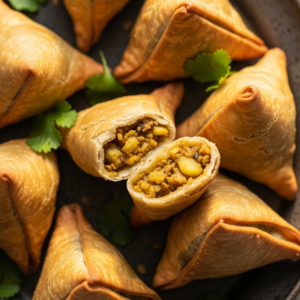
There’s something undeniably magical about biting into a perfectly crispy, golden-brown samosa-its crunchy exterior giving way to a warm, flavorful filling that dances on your taste buds. This quintessential Indian snack has won hearts across the globe with its irresistible combination of texture and taste. Whether enjoyed as a comforting teatime treat or a festive appetizer, samosas offer a delightful way to explore the rich tapestry of Indian cuisine right from your own kitchen. in this article,we’ll guide you through a crunchy and easy homemade Indian samosa recipe that you can try today,bringing authentic flavors and a touch of tradition to your table without the fuss. Get ready to roll up your sleeves and dive into a culinary adventure that’s as rewarding as it is delicious!
Choosing the Perfect Dough for Crispy Samosas
Crunchy & Easy: Homemade Indian Samosa Recipe to Try Today begins with mastering the dough that holds all the delicious filling together with the perfect crunch. The ideal samosa dough strikes a balance between elasticity and firmness, allowing it to be rolled thin without tearing, yet holding shape well during frying or baking.
Typically, samosa dough is made using all-purpose flour, combined with a little semolina (sooji) for added crispness. Incorporating ghee or oil while kneading helps develop a flaky texture and prevents the dough from becoming tough. Adding a pinch of salt enhances flavor, while cold water ensures the dough remains tight and less sticky.
For an extra crispy exterior,consider resting the dough for at least 30 minutes,allowing the gluten to relax and the texture to improve. avoid adding yeast or baking soda-conventional samosa dough relies on simple ingredients to create its signature crunch.
Mastering the Ideal Spiced Potato filling
Nothing beats a well-seasoned potato filling for authentic samosas. Begin with boiled, peeled, and mashed potatoes as the base. The magic lies in the balance of spices-fragrant cumin seeds, pungent garam masala, and tangy dry mango powder (amchur) come together to create a complex flavor profile.
Add sautéed green chilies, ginger, and fresh coriander to lend freshness and a bit of heat, while mustard seeds add a subtle nutty undertone. Cooking the filling twice-first sautéing the spices in oil, then mixing with the potatoes off-heat-ensures the flavors marry perfectly without turning soggy.
For texture contrast, toss in some roasted peanuts or fresh peas. This filling can be prepped ahead and refrigerated for up to two days, making your planning even easier on busy days.
Tips for Shaping and Sealing Samosas Like a Pro
crafting perfectly shaped samosas can feel intimidating,but a few expert tricks turn it into a relaxing ritual. After rolling out your dough into thin circles (about 6-7 inches diameter), cutting it in half and folding it into a cone shape is your first step.
Use lukewarm water as natural “glue” to seal edges firmly but gently to prevent tearing. Filling the cones with the spiced potato mixture requires moderation; overfilling can cause bursting during cooking. Pinch the open edge tightly, creating neat triangle pockets without gaps.
If you’re new to shaping, practice on a few pieces using flour paste or water glue and keep a damp cloth nearby to cover unused dough preventing drying out. The satisfaction of crafting uniform samosas not only looks remarkable but ensures even cooking.
Frying vs Baking: Exploring healthier Cooking Methods
The traditional samosa cooking method is deep frying, which delivers a golden, irresistibly crunchy crust that’s hard to beat. Use neutral oils with high smoke points like peanut or vegetable oil and maintain the temperature around 350°F (175°C) for even,less greasy frying.
For a healthier twist, oven baking samosas offers a lower-fat option without sacrificing too much texture. Brush the shaped samosas lightly with oil and bake at 400°F (200°C) for 20-25 minutes, turning halfway till crisp and golden. Air frying is another fantastic option, combining crispness with less oil.
Whichever method you choose,remember that patience pays off-cooking in small batches and avoiding overcrowding ensures your samosas come out perfectly crunchy and cooked through.
Prep and Cook Time
- Preparation: 30 minutes
- Cooking: 20 minutes (frying) / 25 minutes (baking)
- Total Time: 50-55 minutes
Yield
Serves 6-8 as a snack or appetizer.
Difficulty Level
Medium: Requires basic dough kneading and shaping skills.
Ingredients
- For the Dough:
- 2 cups all-purpose flour,sifted
- 2 tbsp semolina (sooji)
- 4 tbsp oil or ghee
- ½ tsp salt
- About ½ cup cold water
- For the Filling:
- 4 medium potatoes,boiled and mashed
- 1 tbsp oil
- 1 tsp cumin seeds
- 1 tsp mustard seeds
- 1-2 green chilies,finely chopped
- 1-inch ginger,grated
- 1 tsp garam masala
- 1 tsp coriander powder
- ½ tsp turmeric powder
- 1 tsp amchur (dry mango powder)
- Salt to taste
- 2 tbsp fresh coriander,chopped
- Cooking Oil for Frying: neutral oil like peanut or vegetable oil
Instructions
- Prepare the Dough: In a large bowl,combine the sifted all-purpose flour,semolina,and salt. Add oil or ghee and rub it into the flour untill crumbly.
- Add cold water gradually, kneading into a firm yet pliable dough. Cover with a damp cloth and rest for 30 minutes.
- Make the Filling: Heat oil in a pan over medium heat. Add cumin and mustard seeds, letting them sizzle until fragrant.
- Add chopped green chilies and ginger, sauté for 1-2 minutes.
- Stir in garam masala, coriander powder, turmeric, and salt. Cook spices for 30 seconds to release aroma.
- Remove pan from heat; add mashed potatoes, amchur, and fresh coriander. Mix thoroughly and adjust salt as needed.
- Shape the Samosas: Divide dough into golf-ball sized portions. Roll each into about a 6-7 inch circle and cut in half.
- Form each half into a cone by bringing the straight edges together. Seal with water.
- Fill with 2 tbsp of potato mixture and fold the open edge to seal into a triangle. Use water to ensure a tight seal without gaps.
- Cook the Samosas: For frying, heat oil to 350°F (175°C) and fry samosas in small batches until golden brown, about 3-4 minutes per side.
- For baking,preheat oven to 400°F (200°C). Place samosas on a baking sheet,brush lightly with oil,and bake for 20-25 minutes,turning once.
- Drain fried samosas on paper towels before serving to remove excess oil.
Tips for Success
- Use lukewarm water to seal samosas smoothly-this acts as natural glue.
- Roll dough evenly thin for best crunch; thinness helps achieve that iconic crisp texture.
- Never overcrowd the frying pan to maintain oil temperature.
- Try air frying for a healthier option that still yields great crunch.
- Store uncooked samosas in the fridge for up to 24 hours, wrapped well to avoid drying.
Serving Suggestions
Serve these crunchy delights with tangy tamarind chutney or cooling mint-cilantro chutney. Garnish with fresh coriander leaves and a sprinkle of chaat masala to elevate the experience. Pair samosas with a hot cup of masala chai for an authentic Indian snack time treat.
| Nutrient | Per Samosa (approx.) |
|---|---|
| Calories | 150 kcal |
| Protein | 3 g |
| Carbohydrates | 18 g |
| Fat | 7 g |
Try our signature Masala Chai recipe to complement these samosas perfectly. For more on authentic Indian spices and cooking tips, visit Britannica’s Indian cuisine overview.
Q&A
Q&A: Crunchy & Easy – Homemade Indian Samosa Recipe to Try Today
Q1: What makes this Indian samosa recipe stand out from others?
A1: This recipe strikes the perfect balance between crunch and simplicity. Using a subtle blend of spices and a foolproof dough technique, it guarantees golden, crispy samosas every time-no deep-frying pro skills needed!
Q2: Can I make the samosa dough ahead of time?
A2: Absolutely! The dough benefits from a rest period of 30 minutes to an hour, making it easier to roll out and shape. You can even prepare it the day before and keep it wrapped in the fridge for a speedy assembly later.
Q3: What’s the secret to getting that irresistible crunch?
A3: The magic lies in the dough composition and frying temperature. A mix of all-purpose flour with a bit of semolina or chickpea flour adds crispness,while frying at the right medium-high heat ensures a golden,crackling shell without absorbing too much oil.
Q4: Is the filling customizable?
A4: Definitely! The classic potato and pea filling is a staple, but you can experiment by adding paneer, lentils, carrots, or even spiced minced meat. Just keep the filling dry enough to avoid soggy samosas.
Q5: Can these samosas be baked rather of fried?
A5: Yes! For a healthier twist, brush them with oil and bake at 400°F (200°C) until crisp and golden. While slightly less crunchy than fried ones, baked samosas offer a deliciously guilt-free alternative.
Q6: What dipping sauces pair best with homemade samosas?
A6: Traditional tamarind chutney with its tangy sweetness and refreshing mint-coriander chutney create a dynamic flavor duo. for a twist, try yogurt raita or even a spicy tomato ketchup!
Q7: How long do homemade samosas stay fresh?
A7: Freshly fried samosas are best enjoyed promptly for that perfect crunch. However, you can store them in an airtight container for up to 24 hours and reheat in a hot oven or air fryer to revive the crispness.
Q8: Can beginners realistically make these samosas at home?
A8: Absolutely! This recipe is designed for simplicity without sacrificing authentic flavors. With easy-to-follow steps and a few handy tips, even kitchen novices can master the art of perfectly crunchy samosas.
Craving that satisfying crunch with a burst of spiced goodness? This homemade samosa recipe gives you the keys to Indian street-food magic right in your kitchen-no compromise, just pure, edible joy!
Key Takeaways
Whether you’re a seasoned chef or a kitchen novice, this homemade Indian samosa recipe promises a delightful crunch with every bite-an authentic taste that’s both satisfying and simple to create. By mastering this recipe, you’re not just making snacks; you’re bringing a piece of vibrant Indian culture right to your table. So go ahead, roll up your sleeves, embrace the spices, and let your kitchen fill with the irresistible aroma of freshly fried samosas.Your next favourite homemade treat awaits-crunchy, easy, and absolutely delicious!